Using rouge to protect your solder joins
 Joanne Tinley
As your soldering projects get more complex you can end up with multiple joins close to each other. Here's a tip for protecting previous solder joins!
As your soldering projects get more complex, with multiple joins close to each other, you have to plan out your work carefully.
Sometimes
simply working your way through the different melting temperatures of
solder isn't enough, especially if you have multiple solder joins close
to each other as in the pendant shown here!
Thankfully there are other ways of preventing the solder from melting and flowing when and where you don't want it to!

Solder will not flow onto dirty work - and making sure that your work is clean is one of the 5 tips for getting your solder to flow perfectly that I wrote about here! So, if you deliberately dirty an area of your wor you will prevent the solder from flowing. You can dirty previous solder joins to prevent that solder from re-flowing, and you can also dirty an area of your work that must stay free of solder to protect it from nearby solder.
You can buy heat-protection pastes, but they are rather pricy. Some people
like to use tippex or white-out, but I worry about the fumes that gives
off. It certainly is rather smelly! I prefer to use something I already
have in the studio - rouge.

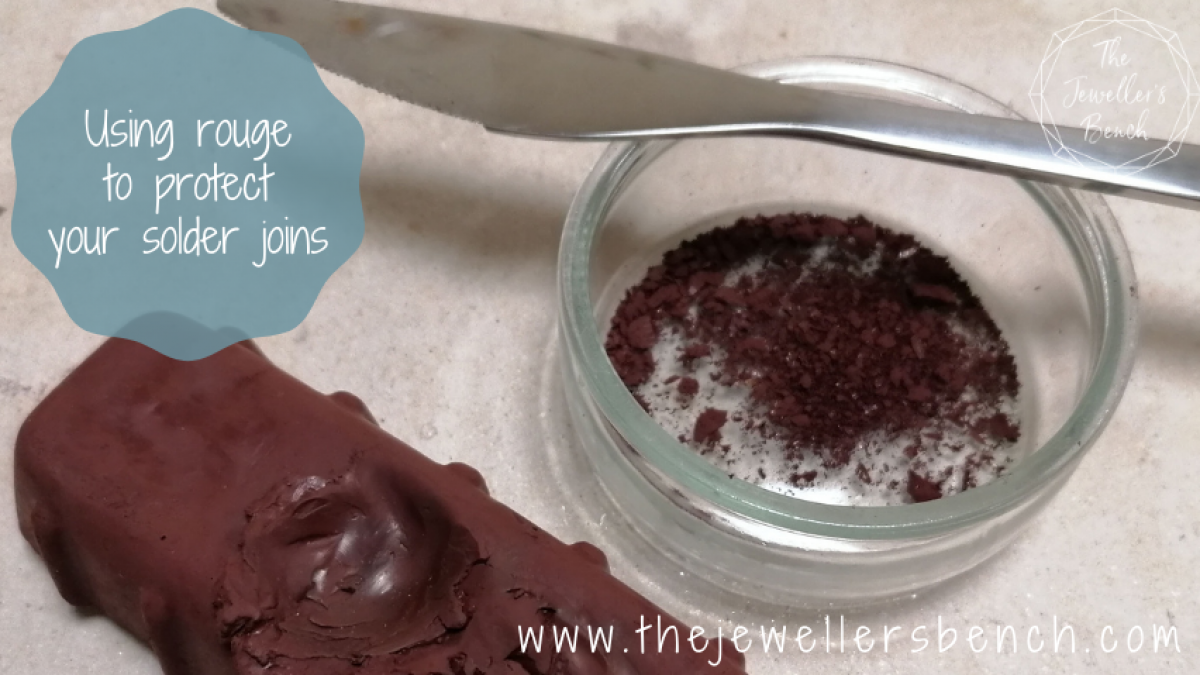
Rouge is a polishing compound that is most commonly bought as a solid block, but you can also buy it as a powder. When applied to a buffing wheel it gives a lovely shine to your silver. However you can also use it to create a paste to paint onto your work to prevent unwanted solder
flows. It is easiest to mix the powder into a paste, but as I've only got a solid block I've scraped some off and ground it down into a powder.
I added a few drops of water at a time, and a lot of mixing was involved to create the paste. Rouge is fat-based and so does need a lot of encouragement to mix with the silver! Make sure that it isn't very runny as you don't want it to flow where it's not needed.

I've used the rouge paste on this pendant as I needed to resolder some of the silver balls in place without damaging the other solder joins that were so close by. I had to be very careful not to put the paste tooclose to my new joins as it only takes a little dirty to stop the solder from flowing properly. You can see that I put the paste inside
the bezel setting for good measure.
After soldering I quenched the stone setting in a separate bowl of water to my usual quench pot andthen carefully cleaned off the dried paste with old toothbrush before putting it in the pickle. I'm also careful not to mix up the paint brush I used for the paste with the one I use for my flux. You don't want the rouge paste to contaminate your tools, quench pot or pickle as it could cause soldering problems in the future!
The classes and blog posts below are perfect for helping you to practise and perfect your soldering skills.... click on the links to find out more!
(and use code TJB15 to get 15% off classes!)
 |  |  |
Why are there different solders and how do I use them? | 5 great tips to get your solder flowing where you want it to go! | Hammered Chain Bracelet |
Learning to solder silver (and copper and gold!) opens up a whole new exciting world of jewellery making, but sometimes all the different terms can be a bit daunting when you're first getting started! Read on and I will explain it all! | Here are some tips to help you get that solder flowing in the right place.... | Learn how to turn a length of wire into a beautiful chain bracelet, and practise your soldering at the same time! |
Categories: : how to, jewellery making tips, problem solving, soldering

Joanne Tinley
Tutor and Founder of The Jeweller's Bench
The Jeweller's Bench is run by Joanne Tinley. She has been making her own jewellery for as long as she can remember and left her first career as a school teacher to set up business as a jewellery designer and tutor nearly 20 years ago. She is
self-taught and like many people started with wire and beads. Learning how to solder, however, opened up a whole new world of jewellery making, one that she is keen to share!
